Showing posts with label Christmas Decor. Show all posts

Tuesday, November 24, 2015

Six Steps to Beautiful Christmas Tree


Last week, I showed you my silver and gold Christmas Tree from my dining room and promised to share more this week about how I decorate my trees.  So when I started on my Teddy Bear tree in the living room, I tried to take pictures as I went to give you some ideas.

Step 1: Set up the Tree I bought a brand new tree this year.  I shopped around a bit because I knew I wanted a prelit tree that had the "sure-light" or "smartlight" technology so that if one bulb went out, the rest of the lights stay lit.  And I also knew that I wanted a "quick shape" tree so it wouldn't need as much fluffing as a regular tree.  I found this one at Hobby Lobby and it lived up to it's promise.  AJ and I got it out of the box and up, lit and ready to start decorating in about 10 minutes.

Step 2: Add Garland  Garlands can be anything from strung popcorn or beads to florals.  On Pinterest a few months back, I saw where someone had taken apart a grape vine wreath to use it as a garland on a Christmas tree.  When I was making fall crafts, I came across two grape vine garlands I bought way back before Roberts Crafts went out of business and I knew exactly what to do with it:

Step 3: Add Fabric  After Christmas last year, I bought a couple of rolls of this burlap at Walmart on clearance.  I had planned to use it for Valentines but never got around to it.
To put it on the tree, I just pinched together the end and ran floral wire around it and attached it near the top of the tree as far into the branch as I could get. 


Then I bunched it back up and attach it to a lower branch like this:


Then I just did a second loop on it like this:


I didn't want to make this a long garland down the tree so I cut it off and then placed five more on the tree.  When I'm placing things on my tree, I always try to form triangles with them.  That helps with a random but uniform look like this:


Step 5: Add Ribbon Streamers  I knew I wanted to put natural burlap on the tree so I found six other ribbons I liked and made two different groupings of ribbons.  I wanted to make sure I mixed patterns and solids and textures.  I took four of the ribbons, made a loop at the top, and added floral wire like this:
Then I attached it to the tree, again setting it back into the branch a ways and letting it cascade down or drape over neighboring branches, however looks best.

To get the ringlets in the ribbon, I used a narrow cardboard tube (the one that the red burlap was wound around) like this (sorry this one is a little fuzzy):


Once I got all the ribbons on, I looked like this:

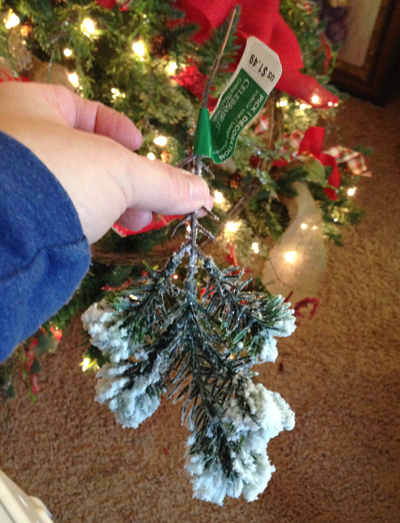
Step 4: Add Picks  Next I added three different kinds of picks to the tree.  The first one I found in the floral department, not the Christmas pick area, so it needed to be cut apart before I placed small sections of it around the tree:


Here are the other two picks I used:


Again, I use the triangle method to place the picks in the tree too.  When that was done, it looked like this:

Step 6: Add Ornaments Of course the last step is to add your ornaments to the tree.  I always start with the largest ornaments first (stuffed bears in this case) and work my way down to the smaller, more traditional ones.   Here is what it looked like when I did all that:

I suppose step 7 would be to finish the tree with a topper and skirt.  This tree is still a work in progress so I don't have those to share with you yet.  I'd still like to some more "chalkboard" style signs to go on the tree.  When it is just right, I'll post another picture (which might be next year).

If you prefer video tutorials, the Jennifer Decorates has a good one that inspired the way I do my ribbon streamers and the first pick I used.  But remember, there is no right or wrong way to decorate a tree.  As long as you love the way your tree looks when you finish it, then that is all that matters.

I still have one more tree to share and of course, I'll continue to share about other Christmas decor projects I have done around my house too.  

Wednesday, November 18, 2015

I May or May Not Have a Christmas Tree Up Already

Pretty sure nearly everyone who reads this blog knows me personally.  And if you have known me or been my friend on Facebook for at least one year than you are already well aware of what I am about to say: I'm just a little bit crazy when it comes to Holiday Decor.   You know Clark Griswold?  I'm his crazy cousin only I decorate the inside of my house instead of the outside.

Usually, I'm pretty good at holding out until at least the week OF Thanksgiving.  But this year, I started obsessing about Christmas decorating in SEPTEMBER!! That may or may not have something to do with not having a Disney Vacation in the near future to obsess about. 

No, I did not put up any Christmas decorations back then. But I did start planning what I wanted to do different (read bigger and better) than last year, including adding a third full-size tree (in addition to the two small ones).  Yes, I am the reason that Hobby Lobby puts its Christmas decorations out for sale right after school starts. 

When we bought our first house, James was not on board with the whole multiple-tree idea.  But I will say, when I broached the subject way back in September of adding yet another tree to the house, he didn't even blink an eye.  After 20 years of marriage, he has finally realized this is a battle he cannot win. (The whole "happy wife, happy life" thing applies).

I've visited every craft and Christmas store between Riverdale and Draper slowly walking the aisles and studying the details of the big fancy trees at Modern Display and Tai Pan Trading.  I've combed Pinterest and YouTube for ideas and tutorials on garlands, wreaths and trees.

So when I woke up last Saturday morning, I had a plan: yes, it's still ridiculously early, but I was putting up a Christmas tree!  I just had to get all those ideas out of my head and into my dining room that day.  My creative friends know exactly what I mean, right?

So here it is:

I had a tough time getting a good picture of the entire tree.  The twinkling lights kept throwing off the focus and it was hard to capture all the detail but it is so sparkly and shiny in real life.  Here's a couple close ups:
 This one shows the gold fabric, deco mesh, and ribbon accents as well as some of the sparkly picks and flowers on the tree.  The ornaments on the tree are mostly mercury glass that I've collected over the past few years.  I just love how they make the tree shine.  And the paper one there in the middle is one I made several years ago featuring Stampin' Up! products.  If I remember right, it was inspired by one Kimberly VanDiepen posted on her blog.


And here's a close up of the tree topper. Like the rest of this tree, this topper had a humble beginning and has evolved over the year.  Last year, it was not nearly this poofy-froofy. (Watch out, that will be Oxford Dictionary's word of the year next year.  Just remember you saw it here first!)  The entire tree wasn't for that matter.  While the ornaments are mostly all the same, (well, of course I bought a few new ones.  Have you seen the mercury glass at Hobby Lobby this year?) the ribbon and fabric treatments are all new and were inspired by the YouTube videos and beautiful trees I saw at the stores.

In case you were wondering, all the extra stuff (excluding the ornaments) came from Hobby Lobby (picks, some of the ribbon and deco mesh), Walmart (clip on poinsettias and gold fabric), and Costco (the gold satin and mesh ribbons).

And if you want to know more about the process of putting ribbons and fabric on your tree, I'll share more about that in an upcoming post so watch for it.  And I'll show pictures of my other trees too.  (No, they aren't up yet, despite my kids begging me to do it.)  They all have completely different styles.

The other reason I put a tree up this early is because I wanted to let my local friends and neighbors know that I am available to decorate your tree too.  Let me know if you want more information!

Tuesday, November 10, 2015

Pinspiration: Once there was a Snowman

Thanks everyone who has welcomed me back so warmly to the blogosphere.  I was a little worried and I still am, but right now I'm just going with it.  Last night I laid awake for hours because I could not turn my mind off from all the things I have inside that I want to write about.  But first off, I have a craft project to share with you.  Now it's a little early for Christmas decorations at most of your homes.  But I have found if I want to make a Christmas decoration, early November is the perfect time!

My fellow Stampin' Up! demonstrator Mickey Roberts tagged me in a photo on Facebook a few weeks back.  It was a Deco Mesh Snowman head that was oh so cute!  I'd post it here, but that photo had no attribution and I'm always leery of posting something when I don't know it's origin and who to give credit to.  I had seen these before on Pinterest, several of them in fact, and at first I thought hey, that's cute but I'm not going to make one.  Then I saw some that were more than just the snowman's head, and included his body too.  Now I wanted one for my front door for sure!

So this weekend, I did:

How fun is that?!?!   I had originally envisioned him having three circle parts, but once I got the head done and realized how big he was going to be, I decided to just make one circle for the body instead of two.   Do you want to make one for yourself?  I have a few tips:

  • First, you'll need some stuff: I used one 12" and one 18" boxed wreath forms (those are the wire frames that you find in the floral supply department), three rolls of white 21" Deco Mesh, a package of white chenille stems (just a fancy name for pipe cleaners), a fun foam top hat, a yard of ribbon for the scarf, and another 18" or so of ribbon and a pick to decorate the hat.  
  • For the face and buttons, I happened to already have these wood pieces that I believe came from Wood Connection in Midvale, Utah.  We made them at a Super Saturday in my old ward several years ago.  (Actually, my extremely talented friend Jen made these so we could have a sample for Super Saturday and I ended up with them after the event.)  They are suppose to be used when you make a real snowman but mine never made it that far. 
  • Find a tutorial on how to make a Deco Mesh wreath.  The internet is lousy with them so you don't need me to make another one.  I've seen these snowmen made with the ruffle technique and the roll technique (are those even the real terms?) but I would suggest you use the 10" Deco Mesh if you are going to use one of those techniques.  I could not find that length this year, so I just attached the mesh to the wreath form with a stem and then bunched it before attaching it to the form again.  That might not make sense now, but it will when you see a tutorial.  
  • The difference between this and a regular wreath is that you need to fill in the middle too.  So I took some stems and strung them across the frame so I would have something to attach the mesh too.  Here's a picture of the back so you can get an idea what I mean (Poor little snowman, all face planted on my tile):
  • There are all kinds of different snowman hats available at the craft stores.  I picked this foam one up at Hobby Lobby in the Christmas craft section.  One of the nice things about Fun Foam is it's very lightweight and it's easy to poke holes through it to attach the pick and another stem so you can attach it in the back like this:
  • And yes, there was a long discussion in our house about the pipe.  I didn't originally put it on there, but the savages came behind me and added it so I left it.  
So what do you think?  Do you want to see more Christmas decor projects?  And yes, I do take custom orders. I'm not entirely sure how I would ship this one but I'm willing to check into it if someone really wanted something like this for her front door. 

(And for the record, I only had this on my front door long enough to take a picture. While I might start putting a few Christmas things up in my house before Thanksgiving, I will not be changing out my fall decor on my front porch until after.)